 **Messages** module on Sapphire's dashboard provides a way to edit all of Sapphire's [default messages](/messages?id=default-messages), create custom [message templates](/messages?id=templates), and manage Sapphire's custom buttons and select menus.
The **Messages** module is divided into three sub-pages and two additional options:
-
**Messages** module on Sapphire's dashboard provides a way to edit all of Sapphire's [default messages](/messages?id=default-messages), create custom [message templates](/messages?id=templates), and manage Sapphire's custom buttons and select menus.
The **Messages** module is divided into three sub-pages and two additional options:
-  **Templates** - Message Templates are your own custom messages. This module allows you to create, edit and send them.
-
**Templates** - Message Templates are your own custom messages. This module allows you to create, edit and send them.
-  **Components** - Manage your custom buttons and select menus.
-
**Components** - Manage your custom buttons and select menus.
-  **Default messages** - Contains all of Sapphire's default messages that can be edited and customized.
- **Message Kits** - Share your default messages with other servers.
- **Send command message** - Manage the message that is sent when using the `sendmessage` command.
## Templates
**Templates** are **custom messages** that can include **embeds**, **buttons**, or **select menus**. They can be easily **sent** to a channel, **scheduled** at an interval or on a specific date and **automated** based on keywords.
They are commonly used for button roles and announcement / sticky / information / rules messages.
### Create a template
1. Navigate to **Messages** ➜ **Templates**
2. Click the blue `Create new template` button.
3. Enter a name for the template, and click `Add`.
### Edit templates using the message editor
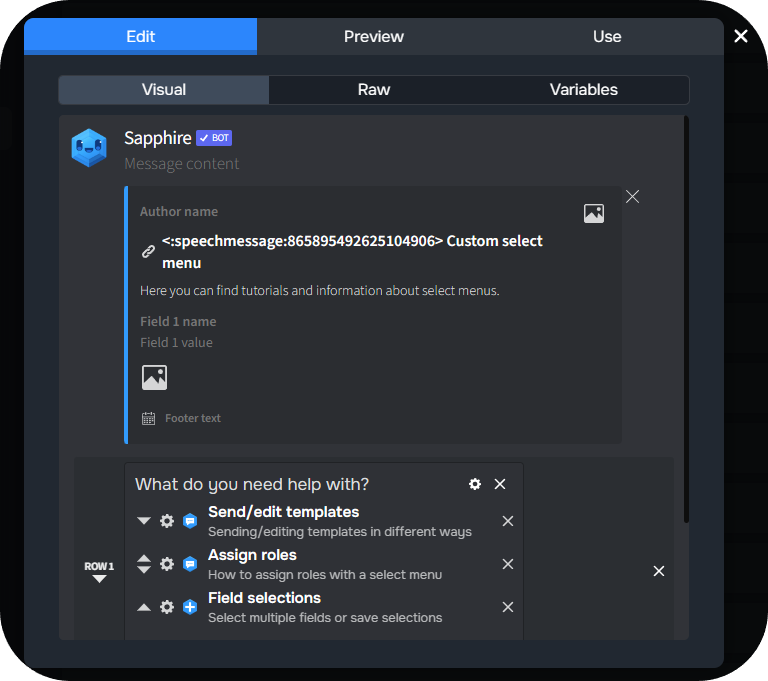
If you want to change the content of a template, click the created template and navigate to the `Edit` tab. You can use normal text, embeds, and components for editing.
By default, when you open the editor by clicking on a template, you'll be brought to the **Preview** tab. The **Preview** tab allows you to view a template without editing it.
#### Edit
The `Edit` tab contains three subcategories that allow you edit the template and change values about it.
| Tab | Description |
|-------------|----------------|
| **Visual** | Fully customize the message using an intuitive editor. Add embeds, select menus, and buttons. |
| **Raw** | View and edit the template’s raw JSON code for advanced customization. |
| **Variables** | Displays all available placeholders that dynamically insert content into messages. Click any variable to copy it. |
**Default messages** - Contains all of Sapphire's default messages that can be edited and customized.
- **Message Kits** - Share your default messages with other servers.
- **Send command message** - Manage the message that is sent when using the `sendmessage` command.
## Templates
**Templates** are **custom messages** that can include **embeds**, **buttons**, or **select menus**. They can be easily **sent** to a channel, **scheduled** at an interval or on a specific date and **automated** based on keywords.
They are commonly used for button roles and announcement / sticky / information / rules messages.
### Create a template
1. Navigate to **Messages** ➜ **Templates**
2. Click the blue `Create new template` button.
3. Enter a name for the template, and click `Add`.
### Edit templates using the message editor
If you want to change the content of a template, click the created template and navigate to the `Edit` tab. You can use normal text, embeds, and components for editing.
By default, when you open the editor by clicking on a template, you'll be brought to the **Preview** tab. The **Preview** tab allows you to view a template without editing it.
#### Edit
The `Edit` tab contains three subcategories that allow you edit the template and change values about it.
| Tab | Description |
|-------------|----------------|
| **Visual** | Fully customize the message using an intuitive editor. Add embeds, select menus, and buttons. |
| **Raw** | View and edit the template’s raw JSON code for advanced customization. |
| **Variables** | Displays all available placeholders that dynamically insert content into messages. Click any variable to copy it. |
 #### Use
The `Use` tab contains four sub-categories to send, edit, schedule, or automate a template.
| Option | Description |
|-------------|----------------|
| **Send** | Sends the current template to a selected channel. Enabling the `Webhook` option allows sending via a previously created webhook. |
| **Edit** | Edits an already sent message instead of sending a new one. Copy the existing message link by right-clicking ➜ `Copy Message Link`. |
| **Schedule** | Schedules the template to be sent at specific times and dates. |
| **Automate** | Triggers the template based on user messages and keywords. |
| **Sticky** | Ensures the template stays at the bottom of the channel. |

## Components: Buttons & menus
The **Components** module is used to create and manage custom **buttons** and **select menus** that execute set actions when clicked. Default messages
The **Default messages** module contains all of Sapphire's default messages that can be edited and customized. This may include error messages, log messages, command responses and more.
Editing Sapphire's default messages is a great way to personalize command responses to your server's unique style, preferences, and branding.
### Edit messages using the message editor
To edit a default message, click the pen (
#### Use
The `Use` tab contains four sub-categories to send, edit, schedule, or automate a template.
| Option | Description |
|-------------|----------------|
| **Send** | Sends the current template to a selected channel. Enabling the `Webhook` option allows sending via a previously created webhook. |
| **Edit** | Edits an already sent message instead of sending a new one. Copy the existing message link by right-clicking ➜ `Copy Message Link`. |
| **Schedule** | Schedules the template to be sent at specific times and dates. |
| **Automate** | Triggers the template based on user messages and keywords. |
| **Sticky** | Ensures the template stays at the bottom of the channel. |

## Components: Buttons & menus
The **Components** module is used to create and manage custom **buttons** and **select menus** that execute set actions when clicked. Default messages
The **Default messages** module contains all of Sapphire's default messages that can be edited and customized. This may include error messages, log messages, command responses and more.
Editing Sapphire's default messages is a great way to personalize command responses to your server's unique style, preferences, and branding.
### Edit messages using the message editor
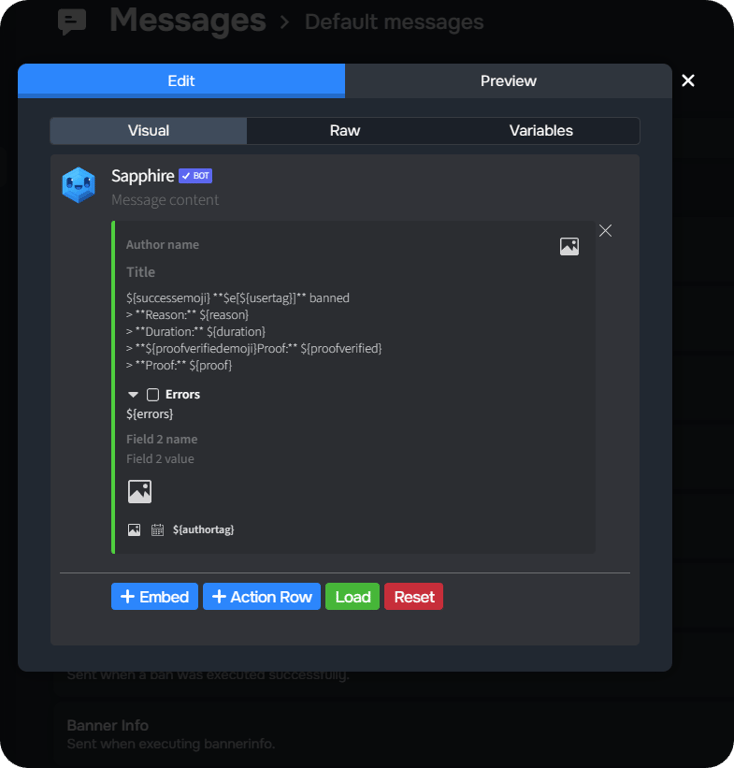
To edit a default message, click the pen ( ) icon next to the message name. Sapphire's message editor will open that allows you to edit the message.
If you want to change the content of a message, click on the default message and navigate to the `Edit` tab. For that you can use normal text, embeds and components.
By default, when you open the editor by clicking on a message, you'll be brought to the **Preview** tab. The preview tab lets you view a message without being able to edit it.
#### Edit
The `Edit` tab contains three subcategories that allow you edit the template and change values about it.
| Tab | Description |
|-------------|----------------|
| **Visual** | Fully customize the message using an intuitive editor. Add embeds, select menus, and buttons. |
| **Raw** | View and edit the template’s raw JSON code for advanced customization. |
| **Variables** | Displays all available placeholders that dynamically insert content into messages. Click any variable to copy it. |
) icon next to the message name. Sapphire's message editor will open that allows you to edit the message.
If you want to change the content of a message, click on the default message and navigate to the `Edit` tab. For that you can use normal text, embeds and components.
By default, when you open the editor by clicking on a message, you'll be brought to the **Preview** tab. The preview tab lets you view a message without being able to edit it.
#### Edit
The `Edit` tab contains three subcategories that allow you edit the template and change values about it.
| Tab | Description |
|-------------|----------------|
| **Visual** | Fully customize the message using an intuitive editor. Add embeds, select menus, and buttons. |
| **Raw** | View and edit the template’s raw JSON code for advanced customization. |
| **Variables** | Displays all available placeholders that dynamically insert content into messages. Click any variable to copy it. |
 ## Message Kits
**Message Kits** are collections of default messages that can be shared between servers using a link. They are created by the Sapphire community.
They may include translations for various languages, different styles, or additional details. A list of user-created kits can be found in **#message-kits** in [Sapphire's support server](https://sapph.xyz/server).
### Manage your kits
When clicking the **Message Kits** option, you'll be given two options: **My Kits** and **Load Kit**.
| Option | Description |
|------------|---------------|
| **My Kits** | 🔹 View your created kits.
## Message Kits
**Message Kits** are collections of default messages that can be shared between servers using a link. They are created by the Sapphire community.
They may include translations for various languages, different styles, or additional details. A list of user-created kits can be found in **#message-kits** in [Sapphire's support server](https://sapph.xyz/server).
### Manage your kits
When clicking the **Message Kits** option, you'll be given two options: **My Kits** and **Load Kit**.
| Option | Description |
|------------|---------------|
| **My Kits** | 🔹 View your created kits. This feature can also be set up and managed via Sapphire's dashboard .
| Command | Description | Usage | | --- | --- | --- | | sendmessage | Sends a message into a specific channel. | sendmessage [channel]